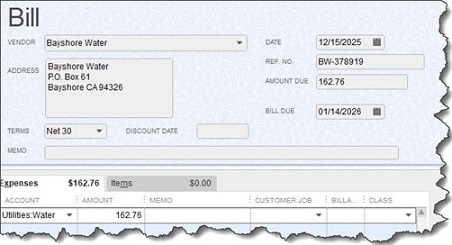
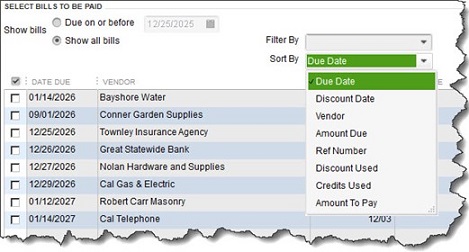
This month, we’ll discuss paying your bills in QuickBooks. Click Pay Bills on the home page or open the Vendors menu and select Pay Bills. The screen that opens displays bills that you’ve entered that need to be paid. You can choose to list those due on or before a date you specify or all bills.

By default, all vendors are represented in the table. If you want to only see bills from one specific vendor, click the down arrow in the Filter By field and select he correct one. You can also sort the list by any of a number of criteria, including Due Date, Vendor, and Amount To Pay by clicking the down arrow in the Sort By field.
Once the table is displaying your bills the way you want, it’s time to select the ones you want to pay. To pay your bills in QuickBooks, you can either click in the box in front of each to make a checkmark or click on Select All Bills below the table. When you select one, the Amount To Pay field will change to reflect the Amount Due. If you can’t afford the whole payment, replace the 0.00 in the Amount To Pay field with your actual planned payment.

Additional Tips When Paying your bills in QuickBooks
QuickBooks provides additional information in the table of bills to be paid beyond Date Due, Vendor, and Amount To Pay. You’ll see a column for a reference number, but there are other columns that can display vendor-issued discounts and credits that could be applied to individual bills. Vendors sometimes offer discounts for early payment, for example, and credits can be issued to settle things like returns or overpayment.
Warning: If you’ve never worked with discounts and credits, we can help you learn about them, create them, and apply them. It’s complicated.
When you’re satisfied with the information in the table, look below it.
Highlight a bill by clicking on it to see what your options are there. You can click Go to Bill to see the original form. If there are discounts or credits available, they will appear there as Sugg[ested] Discount and Total Credits Available. You’ll also notice that any discounts or credits will have been applied in the table above. To change these, click Set Discount or Set Credit.
Make sure the payment Date is correct and select the payment Method. If you select Check, you’ll have to choose between To be printed or Assign check number (for handwritten checks, you’ll be able to specify the number or let QuickBooks assign it in the next window). Select the correct payment Account and click Pay Selected Bills. A Payment Summary appears in the window that opens. You can either click Pay More Bills or Done. If you’re paying bills using more than one payment method, you’d go back to the previous screen and repeat the process.

Helpful automation when paying bills in QuickBooks
As you saw in this example, QuickBooks applied discounts and credits automatically when you selected a bill. To set this up, open the Edit menu and select Preferences, then Bills. Click on the Company Preferences tab, which opens the screen for company-wide preferences that are established by the Administrator.
Click in the boxes in front of Automatically use credits and Automatically use discounts. Then click on the down arrow in the field next to Default Discount Account to open the list. There should be an Income account labeled Discounts. Select this one, then click OK.
QuickBooks provides three reports that help prevent bills from slipping through the cracks. Open the Reports menu and go to Vendors & Payables, then A/P Aging Summary and Detail, and Unpaid Bills Detail.
Running into problems with your accounts payable workflow? Need some guidance any other element of QuickBooks?
Perhaps you want to learn something specific, like the correct way to enter a discount on a vendor bill? Or looking to clean up your QuickBooks for the year. We’d be happy to work with you to smooth out your systems. Give us a call at 360-778-2901.


 Video: Required Minimum Distribution Resumes In 2021